Random thoughts, more rain!

Managed to snap a pic in between storms.


It’s official; we now live in the rain forest! And, when it’s not raining, the humidity hovers between 70 and 80 percent, so it might as well be. Oh well, here I am complaining about the rain when three months ago I was up to my waistline in snow. I guess that spring and fall really are the only good seasons for an outdoor bike hacker like me.

I did manage to get an hour on the Transporter Cargo Bike and added the cables, levers, and shifters. The first test run went well minus the fact that I had almost no air on the front tire. To complete the plan, I still have to get some photos and video of the bike being loaded with cargo, so it will be a game of waiting for the weather to cooperate.

Wow, a day that might not rain!


This week’s forecast is pretty much the same as the last two months with 40 to 60 percent chance of showers, which really means spitting rain every hour followed by intense rain for a few minutes and then 70 percent humidity until the next wave of rain. I don’t ever remember this much rain, and I am seeing plant life that looks like it belongs in the Amazon jungle around here.

New welding and grinding tutorials coming


In an effort to do something useful this year, we have decided to start making some highly detailed welding and grinding tutorials to replace the old ones on our website. These will be step-by-step video and photo tutorials from the very beginning that will show a noob what kind of welder and gear he or she might need, right up to controlling distortion. Since bike building seems nearly impossible out here this year, I plan to retro fit the non-leaky side of my shack with some backing boards and turn it into a video studio to make the new tutorials.

I will be purchasing a MIG welder as well for the tutorials since many are using one and will go through the process of both arc welding and MIG welding in great detail. Grinding tutorials will be the same in depth video and photo tutorials with hundreds of images lots of example videos, and text that explains everything one would ever need to know in order to jump head first into this great hobby.

A robot project from 2001


I like to dig through my old photo archives when I am doing my morning blog. Here is a real retro photo of one of my first large robot projects. If you can drag your gaze away from my super cool sideburns for a second, then you will see that I am riding on the robot, with an RF controller in my hand during a test run of the differentially steered transmission system. This robot was quite unstable and dangerous since it could reach speeds of 20 miles per hour and then flop over face first when something glitched in the motor drive processor!

But, the robot was fun to operate. I would sit indoors looking at a video link being transmitted from the head mounted camera and navigate (carefully) around the block, interacting with stunned bystanders using a text to speech processor that made the robot talk. I do miss building these things. Once I have an indoor workspace again, I have plans to build a 4×4 autonomous robot that will patrol our yard and keep that dumb bear off the property.

Well, I am going to head our and face the rainforest now. I have to find a way to cut the lawn in between drizzle as it is now knee high in most areas. Talk at ya later.

~ Brad

Paper, Proto, Plan, Precipitation!

A tandem tadpole trike sketch

I was really hoping to have the Transporter Cargo Bike ready to show off for this morning’s blog, so far this year has turned our area into a rain forest. Sure, it’s great for the garden and berry trees, but not great for getting any welding or building time in because my shack has no doors or windows and leaks when it rains. Add to that the 2 foot tall grass and I am starting to wonder if perhaps winter would be more productive after all! OK, enough complaining I will save that for the end of the blog!

While searching for something else to blog about, I thought of what it takes to turn an idea into a working project. I divide the process into three steps: paper, prototype and then plan. Most of the time, an idea never leaves the paper stage. I currently have 43 full spiral ringed notebooks of bike ideas that I have collected from over the last five years. Sadly, I never kept notebooks before that time, so a lot of cool and crazy ideas ended up in the recycle bin.

I usually start with a few pages of rough sketching just to get my head around the basic idea and how it might look.  It takes only a few minutes to sketch up a bike. The sketches offer a decent view of many of the difficulties in designing a bike or trike such as chain line, seating position and steering. I can usually determine if an idea is viable within a few pages worth of sketching, and by the 10th drawing often the bike or trike is radically different than the original idea. This tandem tadpole trike sketch seemed workable, so it was one of the few drawings from several thousand that moved to stage two – prototype.

The Viking Tandem Trike

All of the AZ plans go through a prototype stage so that ideas can be tested in the real world and then either modified or scrapped. Having a rough prototype means I can beat the hell out of the vehicle and see what it can take, making any adjustments that may be necessary. This tandem trike proto was made of electrical conduit and BMX wheels and took about two weekends to put together. We tested this trike at a campground for three days, beating it up over trails, down rough gravel roads, and even off road at times. It held up, even though there was no frame trussing and many of the welds were only half finished. My thinking is that if a poorly build proto can hold up to abuse, then a properly built final design would certainly hold up to just about any conditions. So, the next step was to turn proto into plan.

Turning paper into prototype

When I built the Viking Tandem Trike based on the original prototype, I made it a lot more durable and added many new features such as an unlinked transmission system, adjustable bottom brackets, dual disc brakes and under seat steering. The 1.25 inch conduit was replaced by 2 inch square tubing and the frame was properly triangulated for supreme strength. Building a plan from a prototype is a much longer process because every step has to be meticulously photographed and documented, but it is worth the effort when I see completed projects based on our plans being posted in the gallery.

So I am 95% into the plan stage on the Transporter Cargo Bike and only need to add the brake and shifter cables to complete the plan. But, the rain-man seems to have other plans, keeping me indoors as of late.

This is a typical site out here lately

The weather report has been practically the exact same for more than a month – a 40% chance of thunder showers and high humidity. What that means is that it spits rain once every few hours and dumps rain once a day. The grass is constantly wet, and my bike building shack smells like the back of uncle Jeb’s cabin…ack! I am at the point where I need a nice dry sunny day to get the final photos done, even if the rain holds off for four hours, I would be happy. Oh well, the apples and berry trees are sure enjoying the new rain forest, but the lawn is getting so tall it may take three days to hand mow the yard the next chance I get! I wonder, is there such a thing as an anti-rain dance?

~ Brad

DIY always gets attention

I’ve always had a passion for radical bike designs.

If you have been hacking things together for any length of time, then you probably know that your unique creations draw attention wherever you are. When I was in my early teens, I would string four or five scrap bikes together and my buddies and I would wobble down the street on my contraptions that often resembled bikes from Doctor Seuss books. Making it back home in one piece was a 50/50 chance because I usually only brazed my early bike hacks, but the one thing that was guaranteed was a lot of attention.  My intent was never to make something to draw a crowd, but I often found myself talking to a group of interested onlookers or even speaking into the camera on the evening news.

I took a long break from bike hacking after getting my first motorcycle (and job), but found myself back out in the garage in the year 2000 to rekindle my DIY roots and get my mind off the daily grind of living in the real world. I started collecting junk bikes and old power chair parts and concocted some cool bikes and robots out in the small garage just to have fun on the weekend. Oddly enough, I never took any photos or intended to publish these works. One day Kat suggested that I put some of the bikes up on my website AtomicZombie.com, which at the time was a home for electronics hacking stuff I was doing.

Getting youth interested in technology.


Well, within months I started connecting with some amazing people and realized I wasn’t the only one who enjoyed making art from metal, sometimes for fun, sometimes to be practical. It didn’t take long before the word spread locally, and we were dragging my creations to all kinds of events. The large video guided robots were always popular. I enjoyed inspiring young hackers to consider this great hobby. The robots were a natural crowd magnet since I controlled them from miles away via video link and could communicate to people by typing words into a speech synthesis station at the base, making the robot seem intelligent. Soon my remote robots’ main purpose was to draw in a crowd and baffle them with technology.

Photo op with some visiting teens from the USA after my World Record ride.

At one point, I decided to aim for a Guinness World Record, making the tallest rideable bicycle, and figure it would be fun and possible draw a bit of attention to the website which was now mostly dedicated to bike building. Well, I was certainly not ready for the storm that this thing generated once the word got out! I must have done a dozen live radio interviews, news casts and even a live spot on a a national broadcast of Canada AM . Tall bikes sure draw the crowds!

When the tallbike called “SkyCycle” made it to a full color page in the Guinness Book (along with my mug), I was shocked. I knew these crazy contraptions could draw interest, but I had no idea how far it could go. Even a simple recumbent bike like the Marauder would spend half the time parked as I explained the bike to interested people along a ride. No doubt, all you DIY enthusiast out there know what I am talking about.

When I think back to me pre-DIY days, I guess my inspiration did come from seeing others’ creations, although it was mostly in the form of photos from old Popular Mechanics books or the odd newspaper article. Now, with the internet jacked into our heads like The Matrix, it’s so easy to connect with other DIY folks and share advice, so the community is stronger than it’s even been. Back in the early 1980s I would have never thought that one day I would be saying, “Hey!” to a cargo bike builder in Africa and then a trike builder in Australia within a 15 minute span.

So, if you are a new builder just getting ready to roll open that garage door and head out on your new DIY creation, get prepared for the attention your work will draw.  You will now become the source of inspiration for a young generation of future DIYers, so make sure you pass along that attitude that drives us all, “Yeah, you can do this, too”!

~ Brad

Choke cherries and motion sickness


The scenery surrounding my old workshop.


That’s an odd title for a blog entry, isn’t it? Well, this is supposed to be a random spilling of thoughts and this morning I was thinking about another prototype that I never got the chance to test and the ripening orchard full of berries in front of my bike building shack.

The small field in front of my dilapidated construction trailer is a 6 acre patch completely riddled with apple trees, Saskatoon bushes, choke cherries and wild flowers. It’s quite a scene to behold in midsummer. You can literally fill an ice cream tub up in five minutes just standing under one of the bushes. Oh, how I love my Saskatoon pies and choke cherry jams! Of course, I have to do battle with this strange (dumb) bear that has been coming around when it’s pickin’ time.

I call this bear dumb because it likes to rip open our composter multiple times to lick the mold out of the same rotten coconut shell, and prefers to break a berry bush in half to eat the unripe berries at the top rather than simply eating the good ones well within reach. Last year, dumb bear tore up a dozen Saskatoon bushes, leaving the best berries sitting on broken branches and only eating the green ones (along with the leaves) at the top. I honestly think this bear ate someone’s distillery and remains drunk to this day. Yeah, something’s wrong with that furry beast!

Read more>> AtomicZombie Bikes, Recumbents, Trikes, Choppers, Ebikes, Velomobiles, and the Great Outdoors: Choke cherries and motion sickness.

Painting under the stars

Yesterday I managed to get a full day in on the latest project “the Transporter Cargo Bike”. It was a hot one, but now that I have power running down to the old shack, I was able to stay somewhat cool by aiming a huge fan at myself as I welded and grinded away on the almost completed frame. My goal was to complete all of the welding and have the frame painted before the end of the day, but with all of those round tube trusses to weld and the fact that I had not yet figured out the kickstand, I knew it would be a late one tonight.

Since the Transporter was really turning out nicely, I decided to go all the way and add a front disc brake. Actually, this worked out well for the plan because I could now show the steps needed to remove the brake studs from the front fork and install them at the rear and then show how to make a disc brake mount for a front fork that had none. Since most of the stopping power is needed at the front of a bike, the disc option was a good one for a cargo bike that may see loads topping the few hundred pounds mark.

The cardboard template method of making a front disc brake mount went well, and was easy to do thanks to the “weld it in place” method of aligning the brake hardware. I will probably make this into a separate mini tutorial for the main page, since disc brake hardware is becoming very common and inexpensive these days, and is fairly easy to install.

Now, I was faced with how to design the kickstand. A good kickstand is a key feature on a cargo bike; it has to hold the bike stable while the heavy loads are moved on and off the platform. Obviously, a flimsy side kickstand would be pretty useless, so I worked out a stand that would raise the front end slightly off the ground and level the bike on both sides for maximum stability. This type of kickstand is called a “center stand”, and turns the bike into a trike, with three points hitting the ground (two stand legs and the rear wheel). After some testing, the stand proved to work very well and was made out of nothing more than some tubing and bits of flat bar.

When I finally finished all the welding and did a little sanding on the rough spots, the sun was already setting. I decided to paint the bike under the moonlight and brave the mosquitoes that were now coming at me in large waves.

I decided to use brush on paint this time since this bike would be taking a beating and living outdoors mostly. Instead of a perfect paint finish, I opted for a slathered on thick coat that would be easy to retouch as the bike was used like a piece of farm equipment. Under the dim light of the moon, I slopped on the paint as thick as peanut butter, painting the bugs right in as they landed on the tacky paint! I could barely see what I was doing, so I figured the paintjob would be less than pretty in the morning, but yellow is somewhat forgiving and the goal was durable paint, not a showroom finish.

Next morning, I took the frame out for inspectio, and wadda-ya-now, the yellow paintjob wasn’t all that bad! There were a few spots needing a bit of retouching and some runs near the joints, but at a distance of 6 feet away, it looked as good as a spray on paintjob. I may use brush on paint a lot more in the future since it requires no primer, and costs only $10for a can that would paint 3 bikes.

The only drawback to the department store rust paint is the selection of colors: black, white, grey, red, green, blue, orange and yellow. Knowing that I can make any color imaginable by mixing red green and blue, I have a cunning plan for my next brush paint job – mix ’em and see! By using the color picker in Photoshop to get the RGB values, I “should” be able to concoct a similar color by converting the decimal value to a volumetric mixing value.

Well, that completes the first official plan of 2013, so if the weather holds out today I may get the chance to assemble the Transporter Cargo Bike and show it off in tomorrow’s blog entry. I am looking forward to hauling that old freezer out of the bush and then loading a few hundred pounds of firewood onto the cargo bed to make some fun videos of the bike in action. Type y’all tomorrow.

~ Brad

Condolences to Brad, Kathy and family

Hi Kathy, Brad and family.

Kathy—my condolences on loss of your Father. AZ is a big family, and it’s a loss for us all.
Steve Greenhalgh
Beijing, China

More: Condolences to Brad, Kathy and family.

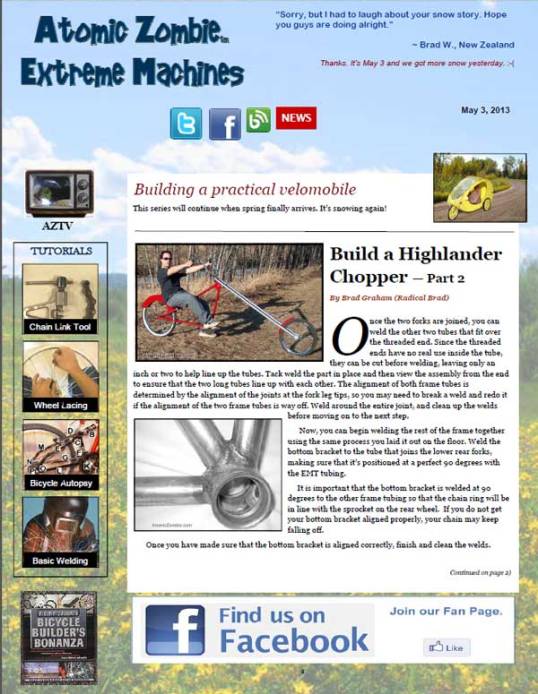
Bike builders news – May 3

bike builders news

Feature article by RadicalBrad of AtomicZombie.com:

Build the HighLander Chopper – Part 2

***
Head tubes and bottom brackets for your bike projects – now on sale
Hub flanges and axle adapters for your bike projects – shipping worldwide   
Chains and brake cables – we want your input
***
Spring Special – Save 10% on all bike parts
Washington students strut their stuff 
 
***
Bike builders community chat – hot topics of conversation
Bike builders gallery new additions – recumbents, trikes, motorized bikes, choppers & more
Builders Feedback – we love to hear from you.

***

Free DIY tutorials – most available in PDF format
AZTV webisode – There and Back Again: A Zombie’s Tale
 
This and archived newsletters are here.

Thanks, we’re OK

Thanks for all the emails and Facebook messages from so many of you concerned about us. Yes, we are OK. Had a scare early Friday morning when a power surge hammered our breaker panel and we were without power for awhile. We worried that there was damage to our breaker (every one of them was tripped) and there was some sizzling.

Hydro crews were already down the road working on something and power was restored within a couple of hours. Then the furnace wouldn’t blow warm air and our outdoor portable shelter was covered in snow and we had to push it all off by hand around 1 am. The wind was unbelievable.

Our cell phone service went out, then the power was on and off again for part of the day which made our Internet connection non-existent for awhile, and I got stuck up to my waist in snow, while being pounded relentlessly by the wind.

Thank goodness we have a wood stove or it would have been pretty chilly in here. The furnace still isn’t working properly. It’s been an interesting 36 hours for sure.

We couldn’t get out of driveway and our road was completely covered with more than a foot of snow. The plows couldn’t keep up with the onslaught of white stuff and wind gusts. Snow drifts are waist deep in some areas of our property.

The snow has finally stopped for now and the sun peaked out around 6 pm, but there’s more snow and freezing rain in the forecast and the wind hasn’t let up.

So, we won’t be sending out any parts orders until late next week, but that will depend on the weather and road conditions. Highways are too treacherous. Thanks for understanding.

There’s more snow and freezing rain coming for part of this week, but we should see positive double digits later in the week and weekend, so maybe spring is on the way after all.

More good news – the furnace is working now.

aprsnow10

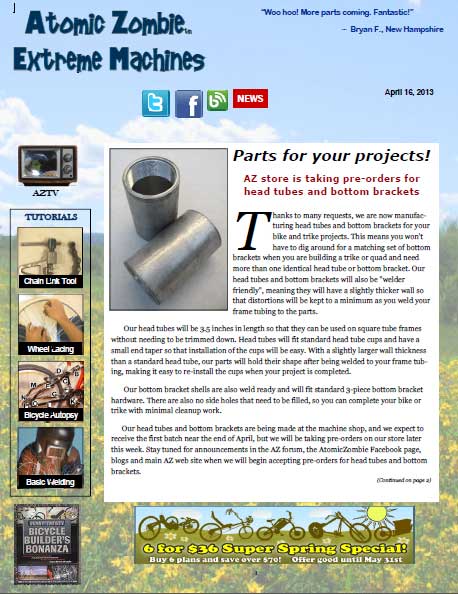
Bike builders news April 16

thumb-april16

Feature article by RadicalBrad of AtomicZombie.com:
Build the HighLander Chopper

 
***
Head tubes and bottom brackets for your bike projects – pre-order now 
***
Spring Special – Save 10% on all bike parts
***
Bike builders community chat – hot topics of conversation
Bike builders gallery new additions – recumbents, trikes, motorized bikes, choppers & more
Builders Feedback – we love to hear from you.
***
Hub flanges and axle adapters for your bike projects – shipping worldwide 
Free DIY tutorials – most available in PDF format
AZTV webisode – There and Back Again: A Zombie’s Tale
 
This and archived newsletters are here.

Update – Head tubes and bottom brackets for your bike projects

We are updating the AtomicZombie store to begin accepting pre-orders very soon. Because we do all of this in our spare time, we have to direct our attention to our “real” jobs and thank you for your patience.

AtomicZombie is a two-person operation – Brad and Kat – and there are only so many hours in day to get things done. We’re doing our best for our AZ family and aim to keep expanding our worldwide community.

We appreciate your understanding and continued support.

Yes, head tubes and bottom brackets are being made as I type this. We expect begin shipping orders in late April or early May.

However, we will be accepting pre-orders within a week. So, stay tuned to the forum, AZ newsletters, blogs and social network sites like Facebook for announcements.