Building a Front Wheel Drive recumbent lowracer – England

recumbent lowracer

Ian Swindells of England built this lowracer from scrap and custom parts.

Ian W. Swindells (forum member swizz69) always wanted a recumbent bicycle. Researching online brought him to the AtomicZombie builders forum.

After learning about the Warrior Tadpole Trike, Swindells was motivated to design and build a Front Wheel Drive recumbent lowracer. In a feature article for the AZ newsletter, Swindells discusses the project and the challenges along the way.

Read his story>>

Chopper mania – USA

chopper bike

Fantastic detail on this bicycle chopper.

 New Yorker and AtomicZombie member, Kempracing, has an addiction. But, don’t worry, it’s a good one.

He loves to design and build choppers. It doesn’t matter if they’re on two wheels or three. Each one is unique. Kempracing puts a lot of thought and care into his bikes.

Check out the detailed web design of this chopper. He built and donated this chopper for a raffle at the Howe Caverns Bicycle Show and Swap Meet in New York this past July. A lucky winner pedaled off with this beauty.

chopper trike

A custom built chopper trike for the Mrs.

And, an embedded star burst heart on the trike he built for his wife, Patty. Awww.

See more of kempracing’s custom built choppers.

Tay’s homemade chopper trike – England

Tay helped his dad build this chopper trike from scrap bike parts.

Submitted by AtomicZombie forum member and bike builder, Naughtyboy.

“We built this because my youngest two kids needed bigger bikes and they both love workshop time with daddy.

One of the kids from school turned up on a shop built chopper, so Tay looked it over and said, “Me and my dad can build (one) better.”

We’ve built all sorts from scrap wood and metal and they have even helped me with rebuilding an old Land rover.

Tay decided he wanted a trike after seeing my Gladiator (chopper trike) plans, and he also looked through my 15 other plans to plan future bikes. The front is based on the Gladiator chopper trike and the rear, I think, was based on the DeltaRunner Recumbent Trike, but flipped over.

The forks are made from 16mm od x 8mm id blow pin shafts left over from machine re-furb at work. Suspension is made of old trampoline springs I found. The handlebars are from an old rotavator which I’m planning on using engine on quad-cycle (so many ideas, so little time).

I had to turn some sleeves to fit them as id was bigger than od of forks. Tay helped with drilling on lathe. Front wheel is 20″ and back started as the same size, but are now 26″ as we needed the smaller one for his little sister’s trike.

I just wish he would let me finish painting it, but he’s too busy racing on the road with his mates! I am impressed with how tight a turning circle it as and how fast he can go.”

Read more about this project at the builders forum:
http://forum.atomiczombie.com/showthread.php/9247-happy-boy

More pictures in the bike builders gallery:
http://forum.atomiczombie.com/gallery/browseimages.php?do=member&imageuser=5871

www.AtomicZombie.com

Max handmade electric velomobile, made in the USA

velomobile

A true green powered vehicle that looks great with mint performance.

AtomicZombie forum member, Canvasman, is crazy about trikes and velos. Check out his latest velomobile. It’s a beauty!

Congratulations on a job well done! See more of Canvasman’s bike creations in the AtomicZombie builders gallery. There are more than 4,000 photos of recumbents, trikes, tandems, tall bikes, ebikes, cargo bicycles, trailers, velomobiles, kids’ bikes, fun bicycles and more.

http://forum.atomiczombie.com/gallery

Homemade FWD Recumbent Lowracer

front wheel drive recumbent

A comfortable and functional handmade front wheel drive recumbent made by Swizz69 in England, UK.

Bike builder Swizz69 of England, UK, shares photos of his recently built recumbent lowracer @ the AtomicZombie builders gallery. It’s a beauty!

“Whilst not a AZ design, it was built with much Zombie inspiration, with 40mm mild steel tube frame and fwd forks, Ocean Cycles seat, Tandem Stem, Sturmey Archer drum braked hubs, Marathon Racer tyres. (It) rides nice and the front wheel drive works well.”

See more @ the AZ builders gallery: http://forum.atomiczombie.com/gallery

Bike builders news – Pedal Positive!

Think Positive…Pedal Positive! In this issue, Joe Crennen, the creative genius behind Pedal Positive, reveals what drives his creativity, the birth of Pedalpalooza and pedal tractor pull competitions. Folks in Colorado love bikes. Read about some of the unique human powered projects Joe works on.

Also in this issue, Builders Gallery: recumbents, trikes, choppers, tandems, kids’ bikes, tallbikes, electric and motor cycles, cargo bicycles, and more. More than 2 million views!

We need your help. Find out how you can get involved.

This and archived newsletters can be found here: http://atomiczombie.com/NewsLetters.aspx

New Plan Online – The Transporter Cargo Bike

The Transporter Upright Cargo Bike


Well, it’s finally online! The Transporter Upright Cargo Bike is the latest addition to the AZ plans page and is ready for download. It has been a real battle trying to find a few hours between the rain to get the bike photographed, but the weekend played nice for an entire day. I had fun moving some cargo around the yard and down our windy, hilly dirt roads and everything worked perfectly.

This plan takes a typical department store mountain bike or road bike and converts it into a rear loading cargo bike, leaving the front section of the bike in its original form. By keeping the part bike mostly unmodified at the front, the ride and stance is much the same as any bicycle, so you can head out into traffic and maintain eye level with those gas guzzlers.

A typical yard sale mountain bike


This plan is highly adaptable to your needs, and includes a rugged frame that can carry many different types of cargo carrying systems. The Transporter can be made to practically any wheelbase and the entire plan only requires standard bicycle components and a few lengths of round or square tubing, so it will be an inexpensive and straightforward build. I opted for a flatbed cargo top since I intend to move some large items around such as firewood and potted plants.

Testing the brakes down our hill


I loaded some heavy cargo and drove the bike down the steep hill up to our driveway for a brake test. Even using only the front disc brake seemed to offer adequate stopping power, and the handling was good. The only learning curve was getting used to the wide turning circle of a bike with an 8 foot wheel base. I did manage to get it turned around in the width of our narrow dirt road, but did use the entire road to do so. For typical navigation, the bike handles just like a regular cycle.

Blending in with the wildflowers


Our field is just bursting with color these days thanks to the rainforest-like climate over the last few months. Normally, the wildflowers bloom in shifts of yellow, white and then purple, but this year they are all here at the same time. I rolled the Transporter over to the edge of the yard and got some great shots of the bike contrasting against the rolling blue and white sky and the matching yellow in the field. I think photographing a bike is almost as fun as riding it, and I enjoy trying out different backgrounds to set the mood of the shot.

Well, there you have it, another plan completed. We are now turning our focus towards a set of highly detailed welding, grinding and bike hacking tutorials which will be part of our tutorials page and offered for sale as a complete DVD as well. I should be able to do most of the filming under the non-leaky section of the old trailer, so the rain will not get in the way this time.

~ Brad

100 million volts and an un-ridable scooter

Lightning and propane – not so good! This picture was taken after dark.

Last night was yet another typical example of the weather around here for the last two months – torrential downpours followed by non-stop lightning. Is it just me or has the weather really changed over the last few years? Everything is much more intense it seems, with more snow, more rain, more heat and more cold. Global warming? Yeah right, maybe in the summer, but winter around here is worse than ever. I would like to propose a new term for this wild shift in weather – “Climate Amplification”. Things are not hotter or colder; they are just more intense.

But, I did have fun with the camera last night.

A very intense strike at the back of our yard

The lightning flashes were so intense and so often that it was easy to capture them with a camera. Odd, when I was younger I tried so many times to get just one photo of lighting but never could and now I can get 50 good shots on two days out of a typical week. Perhaps my next project should be a giant high voltage capacitor that can store 100 million volts and then convert it to a lower voltage for later use. Hmmm…as some of you might know from this project, I actually have built equipment almost capable of that feat!

http://lucidscience.com/gal-rock%20disaggregator-1.aspx

Oh well, the show was definitely fun to watch, and the strikes were not so close that we felt like running.

Watching lightning is so cool! My favorite strikes are the ones that look a mile wide and make that phhhzzzzttt-shhhaaaaaaa-powwwwwwww sound, rocking the house to the foundation. I actually captured one of these strikes last night, and judging from the photo, the strike was probably just at the boundary of our yard, about a mile away. You know the lighting is close when sound and flash are less than a second apart since sound travels at 750 miles per hour.

I could never actually ride this thing!

OK, enough about the weather, it’s starting to aggravate me now since once again I am stuck indoors due to the usual 60% chance of thunder showers today. Maybe one day I will actually get to take the last few photos needed to release the Transporter Cargo Bike plan.

As a diversion, I dug deep into my bike graveyard photo director and found this funny one wheeled scooter contraption that I built and could not ride. The idea was to balance like a pendulum and kick with one foot to glide. I figured it would take some serious practice to learn to balance this thing, but being decent on a unicycle and able to pilot almost anything, I thought I could do it – wrong! After a long weekend at camp and almost non-stop practice, I managed a total of about 100 feet on the one wheel scooter. Seems, there was not enough counter force at work when pushing along the Z axis, although side-to-side balancing was pretty easy.

Of course, I will never give up until I make a workable one wheeled scooter and do have another plan that involves some counter acting weights and a sneaky lever system, but probably won’t try it anytime soon. I did make this thing out of the one wheel scooter though, so it wasn’t a total loss.

http://atomiczombie.com/Tutorial%20-%20The%20Spin%20Scooter%20-%20Page%201.aspx

Well, that’s about it for now, not too much in the way of bike building progress, but tomorrow is actually calling for no rain, so the Transporter may get finished finally. If it rains again tomorrow, I am giving up on building anything with wheels and will start making water craft!

~ Brad

www.AtomicZombie.com

Paper, Proto, Plan, Precipitation!

A tandem tadpole trike sketch

I was really hoping to have the Transporter Cargo Bike ready to show off for this morning’s blog, so far this year has turned our area into a rain forest. Sure, it’s great for the garden and berry trees, but not great for getting any welding or building time in because my shack has no doors or windows and leaks when it rains. Add to that the 2 foot tall grass and I am starting to wonder if perhaps winter would be more productive after all! OK, enough complaining I will save that for the end of the blog!

While searching for something else to blog about, I thought of what it takes to turn an idea into a working project. I divide the process into three steps: paper, prototype and then plan. Most of the time, an idea never leaves the paper stage. I currently have 43 full spiral ringed notebooks of bike ideas that I have collected from over the last five years. Sadly, I never kept notebooks before that time, so a lot of cool and crazy ideas ended up in the recycle bin.

I usually start with a few pages of rough sketching just to get my head around the basic idea and how it might look.  It takes only a few minutes to sketch up a bike. The sketches offer a decent view of many of the difficulties in designing a bike or trike such as chain line, seating position and steering. I can usually determine if an idea is viable within a few pages worth of sketching, and by the 10th drawing often the bike or trike is radically different than the original idea. This tandem tadpole trike sketch seemed workable, so it was one of the few drawings from several thousand that moved to stage two – prototype.

The Viking Tandem Trike

All of the AZ plans go through a prototype stage so that ideas can be tested in the real world and then either modified or scrapped. Having a rough prototype means I can beat the hell out of the vehicle and see what it can take, making any adjustments that may be necessary. This tandem trike proto was made of electrical conduit and BMX wheels and took about two weekends to put together. We tested this trike at a campground for three days, beating it up over trails, down rough gravel roads, and even off road at times. It held up, even though there was no frame trussing and many of the welds were only half finished. My thinking is that if a poorly build proto can hold up to abuse, then a properly built final design would certainly hold up to just about any conditions. So, the next step was to turn proto into plan.

Turning paper into prototype

When I built the Viking Tandem Trike based on the original prototype, I made it a lot more durable and added many new features such as an unlinked transmission system, adjustable bottom brackets, dual disc brakes and under seat steering. The 1.25 inch conduit was replaced by 2 inch square tubing and the frame was properly triangulated for supreme strength. Building a plan from a prototype is a much longer process because every step has to be meticulously photographed and documented, but it is worth the effort when I see completed projects based on our plans being posted in the gallery.

So I am 95% into the plan stage on the Transporter Cargo Bike and only need to add the brake and shifter cables to complete the plan. But, the rain-man seems to have other plans, keeping me indoors as of late.

This is a typical site out here lately

The weather report has been practically the exact same for more than a month – a 40% chance of thunder showers and high humidity. What that means is that it spits rain once every few hours and dumps rain once a day. The grass is constantly wet, and my bike building shack smells like the back of uncle Jeb’s cabin…ack! I am at the point where I need a nice dry sunny day to get the final photos done, even if the rain holds off for four hours, I would be happy. Oh well, the apples and berry trees are sure enjoying the new rain forest, but the lawn is getting so tall it may take three days to hand mow the yard the next chance I get! I wonder, is there such a thing as an anti-rain dance?

~ Brad

My TimberWolf Delta Trike Project

By Dennis Martin

Two years ago while on vacation in Iowa after mentioning RAGBRAI (Register’s Annual Great Bicycle Ride Across Iowa) my wife said to me, “Why don’t you do that again?”

I hadn’t ridden the ride since RAGBRAI XVI (1988), but after thinking about it for a while I thought it might be fun to do it again. The first thing I decided was that I wasn’t going to do it on a regular bike!  I’ve got too many memories of aching back, shoulders and wrists from riding a regular road bike. I wanted a recumbent! Wow, I couldn’t believe how expensive they were, and I didn’t really see one I liked that well. That’s when I ran across Atomic Zombie and their TimberWolf Delta Trike.

 
Photo 1: Chain guard on tension pulley.

I watched the video and thought to myself, “What a cool trike!” I ordered the plans and spent several days reading through the plans to get ideas on where to get the parts and various items I would need. I immediately started browsing Craigslist for cheap parts. In that way, I got fairly lucky.

I found a mountain bike for cheap and was able to scavenge the bottom bracket, derailleurs, shock and frame pivot. I also used the pedals and the brake levers.  I managed to get the whole front end on a 20″ bike from Goodwill for $5! I found an estate sale on Craigslist from a bike shop owner and managed to get brand new chain (a carton of 10), complete crank and bearings and the disk brake. All were new in the box and at a significant saving over retail.

Thanks to AZ for selling the hubs and I was ready to start assembly. Assembly is pretty straightforward per the plans, but I found as I went along that there were a few changes I’d recommend to others if they want to try this (or similar) construction project.

The first thing I found was that the tension pulley really needs a chain guard. I found that if back-pedaling, the chain would drop off the pulley wheel and then get caught between the pulley and the frame when forward pressure was applied. A very simple piece of strap steel bent into a long “U” shape and attached to the pulley bolt will keep the chain in place.  Nice, simple (and inexpensive) fix (see photo 1).

Next, on the advice of my local bicycle shop, I went with a two-bolt mount for the handlebars.  The kind shown is the plans is hard to find and in reality it is much easier to mount the handlebars if you use the two-bolt assembly. That way, you don’t have to pass the entire handlebar assembly through the mount if you need to attach/detach the handlebars (see photo 2).

Photo 2: Two-bolt handlebar mount.
 

I discovered while assembling the seat that a better way to mount the wooden seat to the frame is to use T-Nuts and bolts rather than using wood screws. This offers a much easier way to attach the seat and won’t strip out if you have to remove the seat very many times (as I found you will do) during construction.

The plans call for a rear cargo area which is actually a Coleman cooler.  AZ told me they got theirs from Canadian Tire; I was able to order one online from Target. I chose the red one and that decided the color for the rest of the trike. I wasn’t happy with the plans where they actually have you drill holes in the cooler, so I devised a mount that wouldn’t require you to ruin a perfectly good cooler by drilling holes in it.

Instead of 3/4” tubing, I used some left over 1/2” tubing that I had left from a gate project and made a rectangular frame that just fits around the cooler. I attached a 1/2” tube on the back with some angle braces and it now attaches to the 3/4” tube that comes down from the back of the seat rest using a bolt to hold it in place. The 1/2” tubing fits perfectly inside the 3/4” tubing, and as you can see in Photo 3 the bolt is held by a wing nut to make for easy removal. I also made another carrier for the back with I will use on RAGBRAI to hold my camel back pack rather than transport the weight of the cooler on the whole trip.

Photo 3: Rear cargo carrier mount.

In Arizona, bicycles are required to have tail lights. I had difficulty finding something that would fit and be bright enough to be seen even in bright sunlight. Problem solved thanks to a couple of LED flashlights available from Home Depot (they come in a two-pack for about $9). Some inexpensive tool brackets and they are ready to go. These flashlights have a four-way light system: white, red, green and flashing red.

I mounted two of them on the rear frame and turn them both on to flashing red. They don’t blink at exactly the same rate, which works well in giving a random flashing pattern which is very visible (see photo 4).  In order to mount these evenly, I used the short stub on the right side of the rear frame for one light, and welded a bracket to support the other light. The bracket is made from a scrap piece of frame tubing. These clamp on really tight, and the flashlights are weatherproof, so I shouldn’t have to worry if I get rained on. The flashlights run on 3 AAA sized batteries each and should run for a long time in flashing mode.

Photo 4: Rear light mounts (one on each side).

The last modification was to add a bicycle flag. Sitting low to the road as this trike does, I wanted all of the added visibility of a bike flag. Unfortunately, bike flags normally mount to the axle nut on a regular bike. No rear axle nuts on this trike! Problem solved by making a bracket from some 1/8” angle iron and welding some gussets to make a sturdy frame.

Photo 5: Bike flag holder.

Next, I took another scrap of frame tubing and cut it out as seen in photo 5. An end cap is welded on to make a base for the frame to provide a way to mount to the bracket. I used a piece of 16 Ga. steel to make the clamp. By heating and striking it with a chisel while setting on top of a vise with the jaws open slightly, I was able to get a “V” shape and get the shape you see in the photo. Three 1/4” bolts with wing nuts hold the clamp in place. This makes it easy to remove the flag when transporting the trike so that the flag won’t get damaged or get in the way.

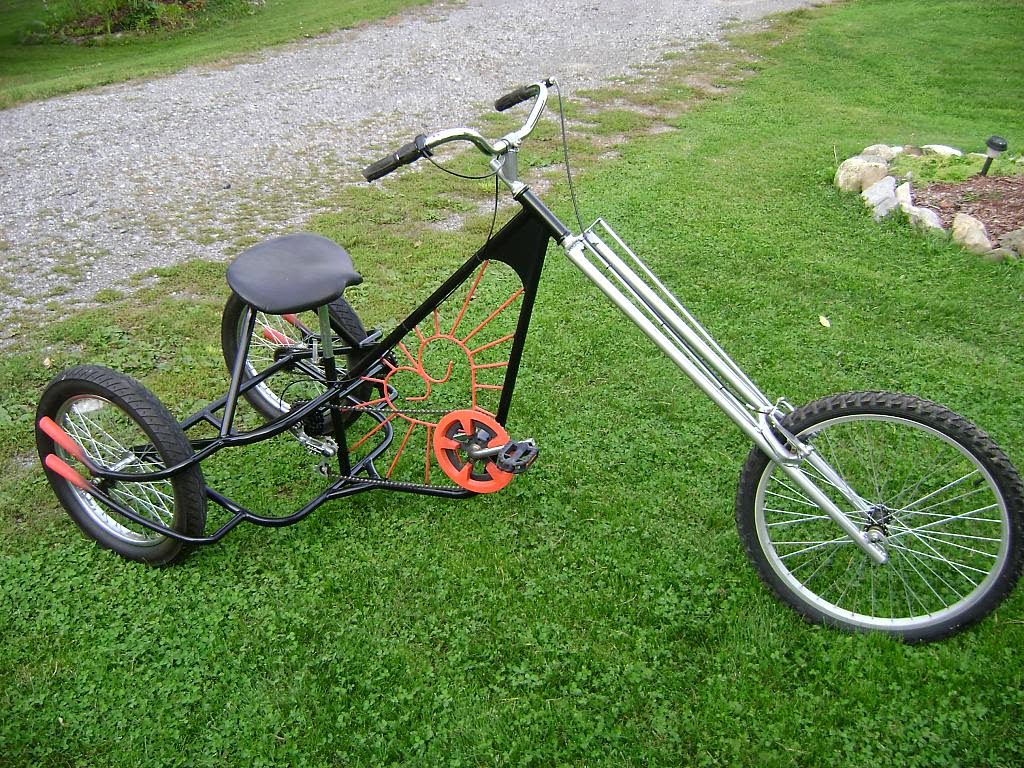
Photo 6: The finished product.

I’m looking forward to riding this on RAGBRAI XLI this year (July 21 – July 27). Maybe I’ll see some other AZ bikes on the ride. Happy pedaling!

Dennis Martin, Sun City, Arizona

Thanks for this excellent article and pictures, Dennis. Great building tips, too. Have a good time.